Cutlery tests

I got my first press mould back from the make space this week.  I decided I would just print the spoon to begin with as a test.  I first used some 0.35mm copper to make sure both the press was strong enough and I can use the thin copper one as a master shape. 

​​
I after cutting this out I hammered it flat and used it as a template for a 1mm thick press. 
I am happy with both the shape of the handle and the spoon, however the neck is a little thin and I feel I need to plannish this to strengthen it.  I may need to make a stake for this as nothing is fitting in the workshop. ​

​​​​

I spent some time cleaning up.  I think I need to make the shape of the neck a little thinner on the template as this one was overlapping slightly.  This will also hardened the metal more but I’m risking loosing strength in the width. 

To be continued………..

Egg Cups

I have been really enjoying raising metal in the workshop over the last few months. Aside from getting very toned in one arm, there is something very therapeutic about creating objects by hand.


I first cut out two disks 75mm radius.  I later had to cut this down by about 12mm so I should have begun with 62-64mm.  This means the edge on this piece will be thinner than I would like. 

I have almost got them to the shape I like but want to bring in an egg next week to make sure they fit perfectly. 

I plan to 3D print and cast matching bases for them.

Water jug

I have been raising a small water jug which I intend to make into a set with two glasses over the next few weeks. 

I used my 3D printed brass hammer to do most of the raising.  I wanted to take a similar from to a traditional whisky tumbler only with a small spout. 

I finished off the piece with my 3D printed steel texturing hammer which gave an interesting finish.

The last thing I did was hammer in the spout. I used the edge of a hammer to do this.  I still have some finishing to do. I’m not entirely happy with the shape around the middle and around the rim.

I feel I may need to make a wooden stake to give me the right shape.

I am planning on 3D printing a base for it to stand as well as a matching handle. 

Cutlery

This week I have started to design my cutlery in CAD.  I have been thinking about this for a long while and trying to decide weather to hand forge them with my 3D printed hammer or press them.  As I have time restraints on the build I decided that pressing them would cut down time in production of a large quantity.

1

I have played around with shapes and forms and decided to go for something simple but with a twist in the form.  The CAD models have taken about 3-4 days of trying to come up with the best forms.  I’m the end I used a combination of t-splines and surface modelling.  Although the surface modelling took a lot longer I got better results.2

I should get the press mold back next week to try the spoon as a test.  Then I can make any tweeks I need to make to the design of the mould fore the rest or the range.4

Copper Bowl


I had a very exciting few days in the workshop testing my hammer.  One thing that I didn’t realised was that the handle was too big to grip properly.  So I went to the wood workshop and got it sanded down on the belt sander.

Sandra Wilson then gave me a quick afternoon master class in Dutch Raising.  Dutch raising differs from the more well known technique of angle raising in that you hammer from the inside of your piece out.  This creates a wave in the metal as you push the metal round.  After each round you calque the edges and the re-anneal.

The second day I continued the piece and go to the planishing stage.  I used my 3D printed steel planishing hammer.  I also used the wrong steak at one point which put dints into the bottom of the bowl.  I actually quite liked this so I ran with it.


I wanted to finish the bowl well and in an interesting way.  I had some copper foil which I wanted to use for the inside of the bowl.  I tried a sample of copper on copper kuem-boo but this didn’t work because copper doesn’t fuse.  the samples just flaked off and they also changed to a more pastel colour.

I decided then to leaf the inside using adhesive.  The outside of the bowl I finished with platinol and I burnished the top edge to a shine.


Stool design

After going through many CAD model designs for the stool.  I decided to have a go at constructing a stool thought 3D printing plastic joins that would hold the structure in place whilst welding.  I ran into a few problems very quickly in the construction of the base.  After welding most of the base together I realised that the steel had warped.  this could have been due to heat expansion.

There were also parts of the design that were too close together and difficult to impossible to weld.

After spending a few weeks on this I decided to go back to the drawing board and simplify the design.  I drew many other models that gradually became more simple.  I still wasn’t entirely happy with the construction and felt what I was trying to achieve was far too complex and may not end up with a good result.stool.png

After discussion with Jon Christie about furniture he suggested that a simple three lagged stool is the most stable stool you can have.  As the stool is for my workshop I felt it was an important design idea.  I then spent a few more CAD models perfecting just one element that would be 3D printed to hold together my stool.  stooltop

The piece can be screwed into the seat from the middle and the three legs can be slotted in.  I am now in the process of 3D printing a prototype to test the element.

seatbit

Kitchen knife

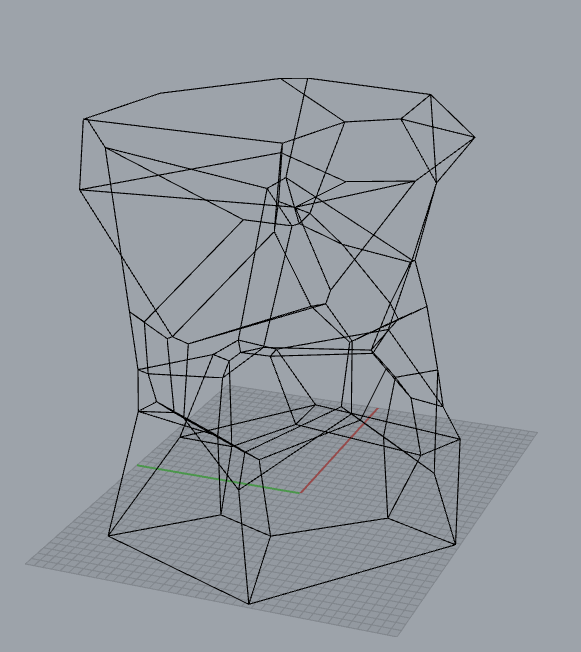
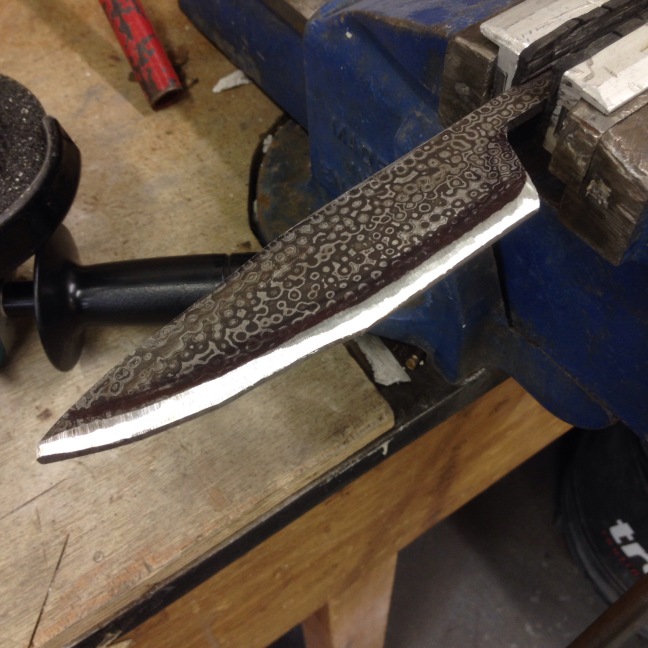
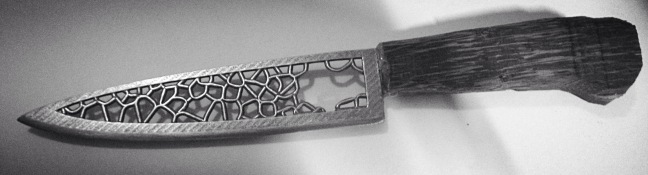
One of the main tools I need in my kitchen would be knives.  This is the second knife I worked on.  For this I designed the knife in CAD and 3D printed the blade in steel.  The cost of a solid knife was far too expensive to justify 3D printing, so I decided to cut out most of the weight from the middle of the knife.

knife1

I then used algorithms in grasshopper to put back in place a structure to give more strength to the piece.  Using grasshopper allowed me to play with the structure until I found an arrangement I was happy with.  This was great in this particular case as if I had drawn this in rhino alone I would have only had the option I had drawn and it would have been far more difficult to change.

kniferend

The knife cost £34.15 to print from Shapeways.

The first job I had was to sharpen the blade.  I didn’t want to temper the steel so I avoided using a machine to grind the edges.  At first I used a file which took off most of the edge.  I was then given a sharpening stone from a friend which was far easier for the job and took very little time.

The next job I had was to make the handle.  I wanted a contrast in the piece between handmade and CAD build work as I felt this would add part of my soul into the work more with combining the handmade element.

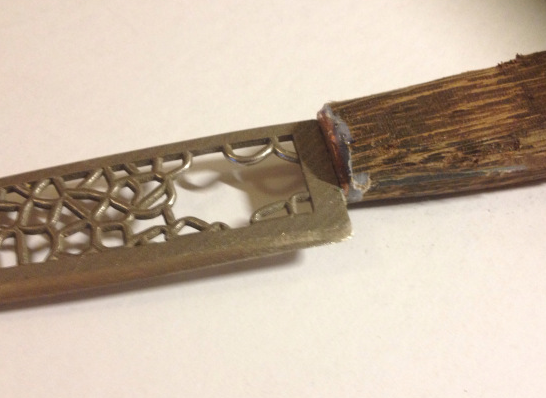
I cut a piece of metal to act as a stopper at the end of the handle.  This slipped down to join between the handle and the blade to make the piece look a bit neater.  I then made the handle using a piece of exotic hard wood called black plamera.  I cut the wood in half and cut out the shape of the handle.  In the centre of the piece I placed some dark blue acrylic sandwiched between light gathering plastic so that when you hold it up to the light you can see through the piece. 


After gluing the handle together with epoxy resin I glued two brass rods though the handle to secure.


untitled

I then filed the handle into shape and sanded down to a high finish.  I used Danish oil to finish the wood to a high polish.

untitled2


Stool Design

Over the last month or so I have been working on design algorithms using Grasshopper in Rhino 3D.  I decided to apply this fist to the stool I will need for my jewellery bench in the workshop.  The reason I chose to apply this to the stool is that I currently have a Pakistani rushty stool which is the perfect size and shape for my workbench.  So I decided to use this as the size and shape that I would use in rhino and then allow the computer algorithms to design the rest of the stool.

It has taken quite a long time and different models  perfect the final design.  I found that some of the T-splines wouldn’t Boolean union which meant I had to delete some elements.  I also had problems with some splines unioning but then the model had no volume.  To get around this I had to keep checking the volume and saving regularly to find and delete the bad splines.stoolrender

I have 3D printed a small model of the stool from my home printer.  Because the size of the university computer is about 20cm I have split the stool into eight segments that will all be printed separately.

From the model I printed I realised that the base of the model would be too thick, so to cut down on materials I have cut the larger model down to 5mm thick at the base.

The stool is now getting printed so I will be looking forwards to seeing the result.


Kitchen Knife

For my Kitchen knifes I wanted to make some comparisons between a mixture of traditional and 3D printed elements of the designs.  I have decided in order to do this I will make two kitchen knives.  One will have a hand made bade and a 3D printed handle and the other will be the opposite.

I have started making the handmade blade from a piece of Damascus steel I had in my workshop.  I drew on the size and shape of the blade and cut this out using a jewellers saw.  I think I snapped about ten saw blades as the metal is really thick and hard.


 I filed off some of the rough edges and then took it to the University workshop to grind down with the hand grinder.  I have a little more finishing off and grinding to do before I will design the handle for it.  I am waiting to know the exact size of the piece before designing the handle so I know it will fit perfectly.

Raising Hammer

Last week my handle for the raising hammer I made in Hungary was CNC milled in birch wood.  It had taken quite a lot of time because previously it had been milled in oak.  When I spoke to the wood technician he said that the grain of the wood was at an angle and that this would split when used.  It brought up a very interesting conversation about the need for craftsmen and traditional crafts skills in the field of modern technologies.  Not all items made using modern technologies will work or be better than something handcrafted but that it is the knowledge of both that are needed to apply ideas.

  
I glued the handle together in the workshop with wood glue and clamped together for around an hour.

 When the handle was taken off the milling machine it had supports on the sides, I cut these off with a saw.  I then filed and sanded the handle and fixed the hammer head in using epoxy resin.

  
I am now using Danish oil on the handle every day for the next week.  I still have to drill a hole through both the handle and the head to fix a rod through.